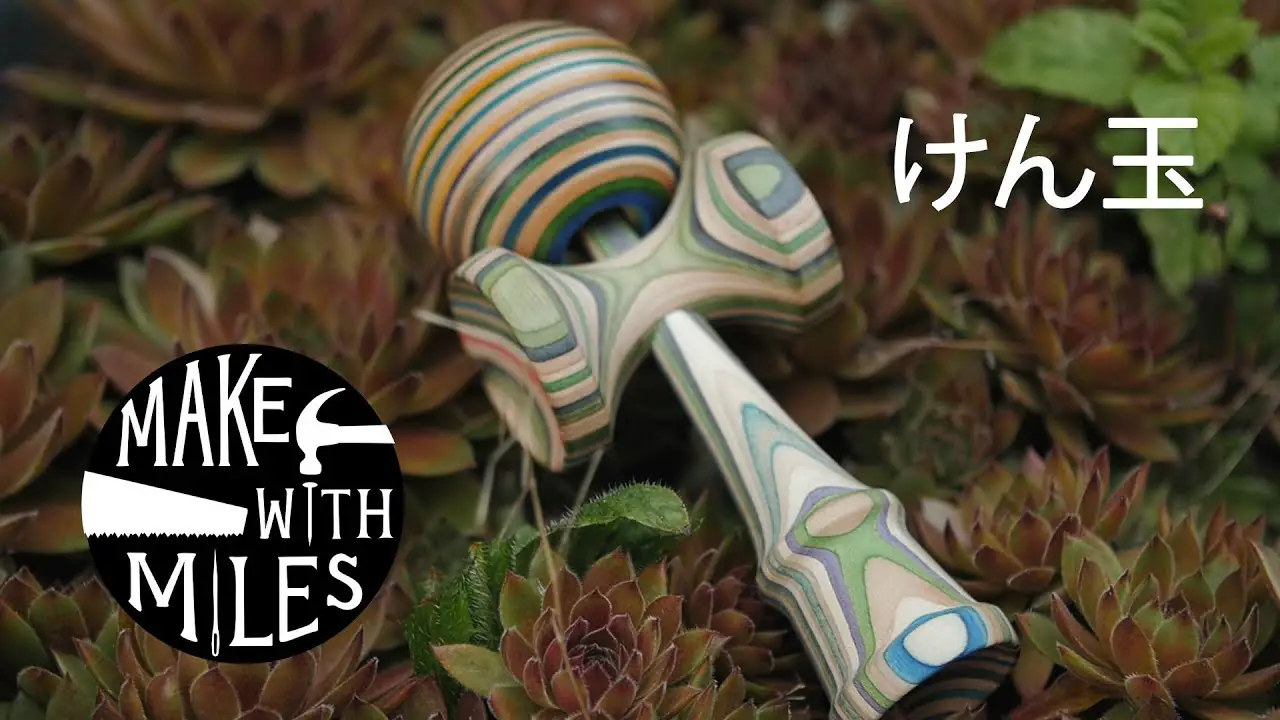
Making a KENDAMA from Skateboards
What’s up everyone, this is the making of a kendama out of recycled skateboards. This is my second kendama I am building. My first kendama taught me a lot about the shape, size and weight, and I soon realized that there’s a lot that could be improved for this build. I wanted to refine the shape, as well as try new material.
Where to find old Skateboards
I was able to get these broken skateboards from the kind folks over at a skate park, huge thanks to them for the support. However i am going to leave you a list below with a few ideas of places you can find old skateboard to recycle just like make with miles did.
- Skateboard Recycling Programs: Some organizations and companies have started recycling programs for old skateboards. These programs collect old boards and then repurpose the materials for new products such as furniture, jewelry, or other decorative items. You can search online for “Skateboard recycling program” in your area to find one near you.
- Skatepark or Skate shops: Local Skatepark or Skate shops may have a collection of old, damaged or broken skateboards that they are willing to part with. They may also know of other local sources of old boards.
- Online Marketplaces: Websites like eBay, Craigslist, and Facebook Marketplace can be a great place to find old and broken skateboards that people no longer want.
- Skateboard Swap Meets or Flea Markets: Occasionally, there are swap meets or flea markets where people gather to buy, sell, and trade old and used Skateboard gear. Look for local events in your area and check with your local Skateboard shops.
- Local Dump or Landfill: You can check your local dump or landfill for broken or discarded Skateboards.
Processing the Skateboards
The first thing I had to do was process all the decks. I started by peeling the grip tape off using a heat gun to melt the adhesive. I then used a dowel as leverage to peel it the rest of the way off. Once I had removed all of the grip tape, it was now time to sand off the graphics and glue residue for this.
I used my king Arthur’s tools, holy Galahad, carving disc, on my angle grinder, the carving disc worked really well, but i think next time i would probably want something. A little less aggressive. The sanding took a very long time, which was no surprise, but when i finally finished it was time to break the skateboards down into usable pieces on the table saw because I don’t have a large press, I had to cut the decks down into smaller and more Manageable pieces, first of all, I cut off the nose and tail which I saved for later. I then cut off the small section where the bolts go to attach the trucks. These pieces are only really usable for smaller projects like pens, so I wouldn’t be using it for this project.
Gluing the Skateboards Together
I now had a stack of skateboards, which were broken into the nose tail and middle sections, but before I could glue up the blanks I needed to cut off the rounded edges of the decks. I saved these pieces also because I’m sure I can find a way to use them in the future. After ripping the large middle sections into the proper size for the blanks I started gluing it up. I used a fair bit of glue for this glue because I knew it would fill any gaps between the layers. I’m only showing the glue up for the ken of the kendama, which is the handle, because the other two gloves were practically the same. If you’re new to kendama’s, I would highly recommend watching my first build video, where I explain in detail what a kendama is and the terminology of the different pieces after unclamping the blank.
Shaping and Carving the Skateboards
I cleaned it up on the bandsaw and cut the corners at 45 degrees. Angle, to make it easier to turn on the lathe, so for this type of lathe project I like to use calipers, so I can reference the shape of another kendama I have, as you can see, this was very helpful for achieving the shape I was after. After sanding, I removed the ken from the lathe and remounted it in my chuck, so I could smooth out the contour of the base cup. With this part done. I moved on to turning the cups, which are also called the sarado for shaping the outer dimensions.
Drilling the Sarado Hole
I mounted the blank using the spur center and then I was able to break off the support material on either side and mount it in the chuck so that I could turn the cups. The next step was probably the most difficult, which was drilling the tapered hole. I don’t have a tapered drill bit, so I started by drilling with a large forester bit and then finishing the hole with a slightly smaller one. This works perfectly well and it made for a very snug fit after drilling the tapered hole. I drilled a small hole in the sarado for the kendama string.
Next, I used that same bit to drill another hole for the string in the ken. Now that I’d completed the ken and the sarado,
Making the Tama
I was ready to move on to the tama. I started by turning the rough shape of a sphere making sure it was a little bit oversized. Once I had the rough shape, I cut off the excess material on the band saw and mounted two wood cups onto the headstock and tailstock of my lathe. I then mounted the tama between the cups and began to turn. I started by taking light passes until the axis I was working on was smooth. I then rotated the ball 90 degrees and repeated this process until I chased it down to a perfect sphere after sanding.
Drilling the Tama Hole
It was smooth . It was now time to drill the hole in the tama. For this I used a fortune a bit and set the depth stop on my drill press, so I wouldn’t drill too far down. I then made the bevel of the tama using a large countersink bit after drilling a small hole for the string.
Finishing Touches
It was now time to finish the top. I’ve had many people ask me about tama finishes, but I’ve been reluctant to recommend anything, because the last finish I used was not ideal. After some recent experimenting, I found that clear flex seal provide a good texture.
Read More: How To Hold A Kendama
Read More: How To Woodturn A Kendama